
In this tutorial, we will discuss about how to install Laravel Passport and authenticate user based on passport JWT Token. All we know laravel is one powerful framework which is base on symphony. It is the most popular framework. Most of the back end developer’s use it.
What is Laravel Passport ?
Previously in Laravel, there was no support for Building API. But in new versions, we have the ability to make API. We need to validate API requests. So, only valid users can access these API’s.
For this auth, we use laravel passport. Laravel Passport provides complete oAuth2 server implementation. For more information on oAuth, click here
Install Laravel Passport
You need laravel application to install passport. If you don’t have application and want to start from scratch then visit here
Steps to Install Laravel Passport
Browse to your application directory then press Shift + Right Click
Open Power Shell

Copy and paste below command, then Hit Enter
composer require laravel/passport
Passport need some tables by default. Once install is complete, passport will add one migration file. It is use to create dependent tables in database. Follow the steps to migrate tables in database and then configuring passport.
Type below command and then hit enter.
php artisan migrate
After migration, you can see some tables in database.

Now type below command and then hit enter. This will generate keys for your passport application.
php artisan passport:install
You are done with installation of passport. Make sure to add class in config/app.php.
'providers' =>[
    Laravel\Passport\PassportServiceProvider::class,
]
Configuring Laravel Application with Passport
Let’s configuring Laravel Passport. Open file app/User.php and then add below code inside class
<?php
namespace App;
use Laravel\Passport\HasApiTokens;
use Illuminate\Notifications\Notifiable;
use Illuminate\Foundation\Auth\User as Authenticatable;
class User extends Authenticatable
{
  use HasApiTokens, Notifiable;
 /**
 * The attributes that are mass assignable.
 *
 * @var array
 */
 protected $fillable = [
   'name', 'email', 'password',
 ];
 /**
  * The attributes that should be hidden for arrays.
  *
  * @var array
  */
  protected $hidden = [
   'password', 'remember_token',
  ];
}
HasApiTokens will make token available in User model. In this model, we define 3 fill able properties that are required for using laravel passport
Name, Email and Password
This fillable properties depend upon your requirement.
One hidden property remember_token that is used to remember life time tokens in laravel passport.
Now open file app/Providers/AuthServiceProvider.php then add below code in boot function.
Now open file app/Providers/AuthServiceProvider.php then add below code in boot function.
<?php
namespace App\Providers;
use Laravel\Passport\Passport; // ---- THIS CODE--------------
use Illuminate\Support\Facades\Gate;
use Illuminate\Foundation\Support\Providers\AuthServiceProvider as ServiceProvider;
class AuthServiceProvider extends ServiceProvider
{
    /**
     * The policy mappings for the application.
     *
     * @var array
     */
    protected $policies = [
        'App\Model' => 'App\Policies\ModelPolicy', // ---- THIS CODE ----
    ];
    /**
     * Register any authentication / authorization services.
     *
     * @return void
     */
    public function boot()
    {
        $this->registerPolicies();
        Passport::routes(); // ---- THIS CODE ----------------
    }
Above code will register routes. It will be use for issue token and then revoke token.
Now open config/auth.php and then replace your API driver to passport
'guards' => [
    'web' => [
        'driver' => 'session',
        'provider' => 'users',
    ],
    'api' => [
        'driver' => 'passport',  // ------ THIS CODE
        'provider' => 'users',
    ],
],
Open routes/api.php file then add below routes.
<?php

use Illuminate\Http\Request;

/*
|--------------------------------------------------------------------------
| API Routes
|--------------------------------------------------------------------------
|
| Here is where you can register API routes for your application. These
| routes are loaded by the RouteServiceProvider within a group which
| is assigned the "api" middleware group. Enjoy building your API!
|
*/

Route::post('login', 'API\UserController@login');
Route::post('register', 'API\UserController@register');
Route::get('activeuser', 'API\UserController@details')->middleware('auth:api');
We have define 3 routes in routes/api.php :-
- /public/api/login (Accepts Post Method)
- /public/api/register (Accepts Post Method)
- /public/api/activeuser (Get Method)
You have to create one controller in app/Http/Controllers and then develop in it. For best practice, you can create controller as shown below and then follow further steps –
app/Http/Controllers/API/UserController.php
This will help you to easily manage API from front end or back end interface controllers.
Define Methods in Controller
Required Libraries
Use below libraries before defining methods
use Illuminate\Http\Request;
use App\Http\Controllers\Controller;
use App\User;
use Illuminate\Support\Facades\Auth;
use Validator;
use Carbon\Carbon;
We have 3 routes login, register and activeuser then we have to create 3 methods in UserController.php
Register Method
    /**
     * Register api
     *
     * @return \Illuminate\Http\Response
     */
    public function register(Request $request)
    {
        $validator = Validator::make($request->all(), [
            'name' => 'required',
            'email' => 'required|email',
            'password' => 'required',
            'c_password' => 'required|same:password',
        ]);
        if ($validator->fails()) {
            return response()->json(['error'=>$validator->errors()], 401);
        }


        $checkExistUsers = User::where('email',request('email')) -> get() ->count();

        if($checkExistUsers > 0) {
            return response()->json(['error'=> 'User Exists'], 401);
        }
        $input = $request->all();
        $input['password'] = bcrypt($input['password']);
        $user = User::create($input);
        $tokenResult =  $user->createToken(request('email'));
        $token = $tokenResult->token;
        $token->expires_at = Carbon::now()->addWeeks(1);
        $token->save();

        $success['name'] =  $user->name;
        return response()->json([
            'token' => $tokenResult->accessToken,
            'expires_at' => Carbon::parse(
                $tokenResult->token->expires_at
            )->toDateTimeString()
        ]);
    }
In above method, I have use Validator to check require fields. Then throw error on fail. After that, I call User model to check user existence. For token expiration, I use Carbon and then add 1 week expire time in token.
In response, I return token and expiration time.
Login Method
    /**
     * login api
     *
     * @return \Illuminate\Http\Response
     */
    public function login(){
        if(Auth::attempt(['email' => request('email'), 'password' => request('password')])){
            $user = Auth::user();
            $tokenResult =  $user->createToken(request('email'));
            $token = $tokenResult->token;
           // $token->expires_at = Carbon::now()->addWeeks(1);
            $token->save();
            return response()->json([
                'token' => $tokenResult->accessToken,
                'expires_at' => Carbon::parse(
                    $tokenResult->token->expires_at
                )->toDateTimeString()
            ]);
        }
        else{
            return response()->json(['error'=>'Unauthorised'], 401);
        }
    }
I use email and password to authenticate user. Then in response, I return token and expire time.

This token has to be sent in headers as a Bearer Token.
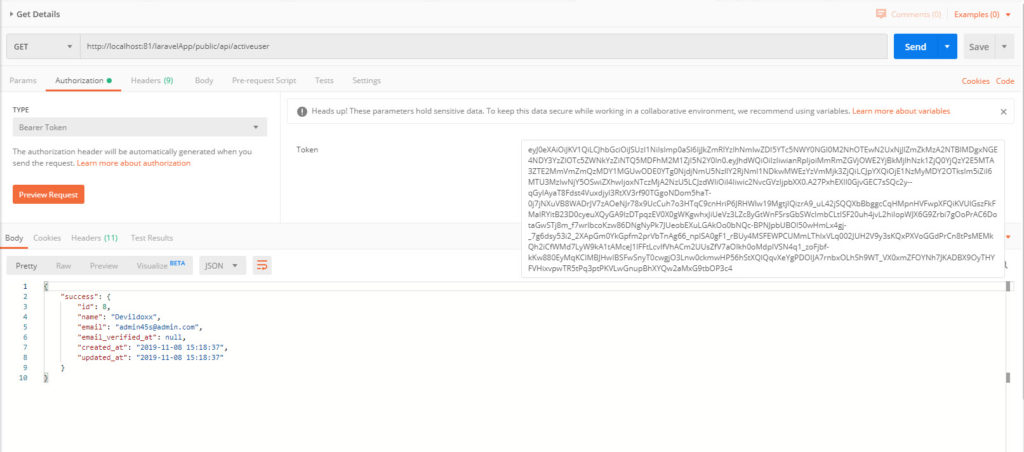
ActiveUser Method
public function activeuser()
{
    $user = Auth::user();
    return response()->json(['success' => $user], $this->successStatus);
}
This method will return active user details when bearer token is sent in headers.
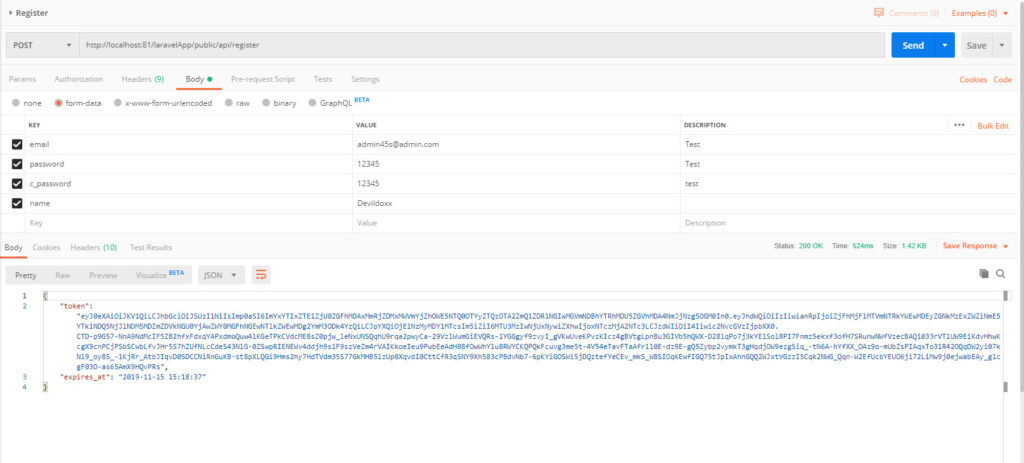
Testing API’s
I use Postman for testing API. Download Postman from here and then install it.

Then it will ask for Request name. Fill as per your need. Then it will show multiple options.

You can see request method on left side. Change it base on request type.
Params to send form fields in API.
Authorization to send token in API request.
Headers to send custom headers in API.
Body to send JSON Payload in API.
Then there is response in which you will see API results.
It supports variety of Authorization. Choose Bearer Token and then paste bearer token. This token you will see receive as a result in Login API.
You need to define token in authorization and then send any API request.
For any type of query click here or send email devildoxx@gmail.com.