
In this tutorial, we will discuss how to develop Android App from website. We will be using latest Android Studio i.e 3.6.3. I will to try to explain it in easy way.
This tutorial is for both Android App Developer’s and Non Android App Developer’s. You don’t need any programming language to build your app. Just follow the steps clearly and then you are ready to use Android App.
You can create Android App for any website but your website should be responsive. Otherwise, it will not look good in mobile devices.
There are some requirement that you need to install before starting development.
- Android Studio
- Any Android Mobile Device
- Good Computer (Optional)
3 point is optional. If you don’t have good computer then you can face slowness while development.
For Installing Android Studio – Click Here
Develop Android App from website
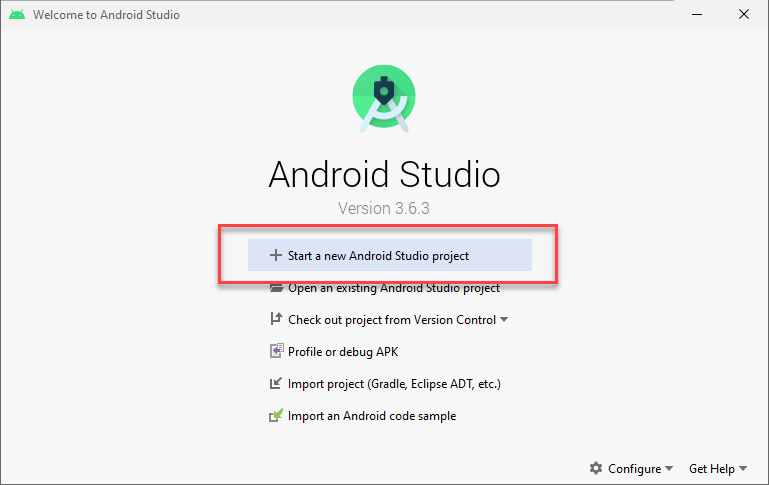
Open Android Studio and then click Start a new Android Studio project
You will see Project Template for your Android App as shown below

Select Empty Activity and then click Next Button.
Now, you will see Configure Your Project Screen as shown below

Configuration to be fill
Name: Name of your App
Package Name: Start with com and then you can use as per choice.
Language: Java
Minimum SDK: API 16: Android 4.1 (Jelly Bean)
All other settings should be default. You will see default language selected by Android Studio is Kotlin. Make sure to change it to Java before click Finish Button
Click Finish and then wait for process to complete.

After few min, you will see screen as shown below

Still you can see some process is going on in bottom of screen.
After all process complete, you will see two files that are by default open

Adding Internet Permission to your App
Basically, we are trying to load your website in Android App. For loading website, then definitely we need internet. By default, your app is not configure to use internet. For adding internet permission :-
Open file AndroidManifest.xml. File is located in manifests folder. For better understanding check below screen shot.

Now copy and then paste below line
<uses-permission android:name="android.permission.INTERNET"></uses-permission>Then your Final file will look like
<?xml version="1.0" encoding="utf-8"?>
<manifest xmlns:android="http://schemas.android.com/apk/res/android"
    package="com.digital.devildoxx">
    <uses-permission android:name="android.permission.INTERNET"></uses-permission>
    <application
        android:allowBackup="true"
        android:icon="@mipmap/ic_launcher"
        android:label="@string/app_name"
        android:roundIcon="@mipmap/ic_launcher_round"
        android:supportsRtl="true"
        android:theme="@style/AppTheme">
        <activity android:name=".MainActivity">
            <intent-filter>
                <action android:name="android.intent.action.MAIN" />

                <category android:name="android.intent.category.LAUNCHER" />
            </intent-filter>
        </activity>
    </application>

</manifest>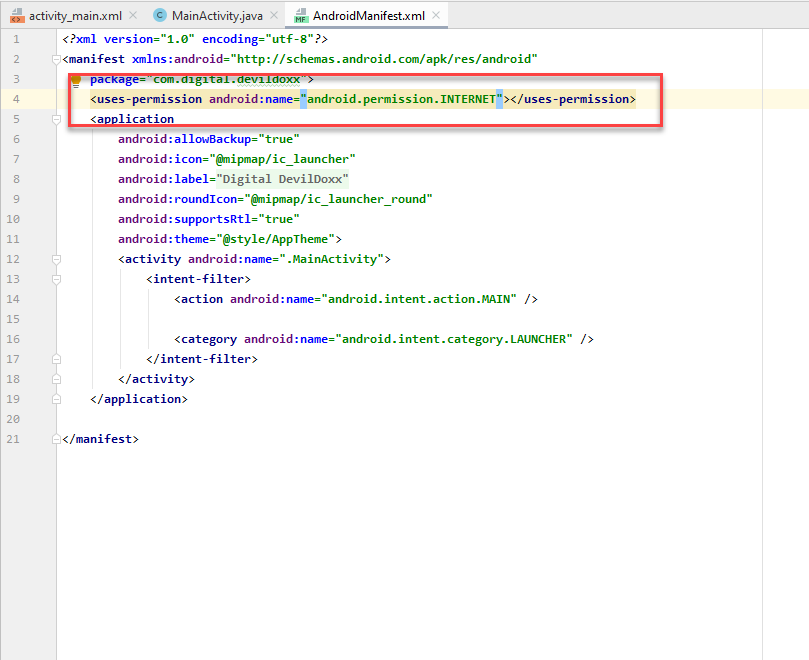
Configuring Front End to Load your website
Go to activity_main.xml file as shown below

You can see Hello World in white preview. Click on Hello World and then press Delete button in your keyboard.

You can see search icon in Palette section.

Click on Search button and then type webview
You will see one element WebView.

Use mouse to drag and drop WebView element. When you drop, it will get resize to screen.

On Right Side, you can see many sections. I have highlighted some sections.
You can see Width and Height in constraints section. These are fill automatically when you drop the web view element.
Similarly, there is attribute section in which you can see id which is set blank.
Change in Constraints Section
layout_height = fill_parent
layout_width = fill_parent
Similarly, in Attribute Section
id = myViewElement

Back End Code to Load Website in App
We are done with front end and required permission for your Android app. Now, we have to develop back end code to load website.
We will do back end code in one file only then we will build apk directly. This file is by default open when you start a new app. If you mistakenly close the file then you can find it here
app/java/package-name/MainActvity.java
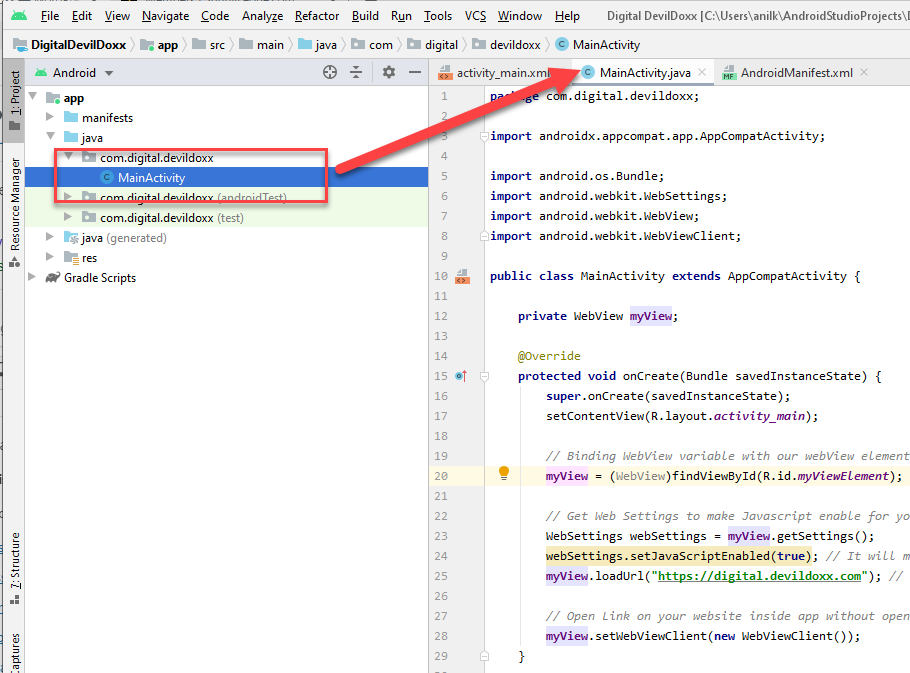
Create private variable myView and then call WebView library in it. Then you can see one function onCreate. Bind your private variable with your WebView Element inside onCreate function.

private WebView myView;


protected void onCreate (...

    myView = (WebView)findViewById(R.id.myViewElement);
}
As you know, all websites uses JavaScript. We have to enable JavaScript in Android app, only then we can use website in it properly.
Settings of WebView
We have to set some settings for WebView. So, that we can enable our requirements. Like JavaScript and URL to load in WebView element.
Copy and then paste below lines inside onCreate function. It should be after binding of variable with element .
    WebSettings webSettings = myView.getSettings();
    webSettings.setJavaScriptEnabled(true);
This will enable JavaScript for your website in Android app. After calling your private variable and then call loadUrl function. In this function, you will pass your website URL.
myView.loadUrl("https://digital.devildoxx.com");Now, copy and then paste one more line after that. This line will open all links on your website inside your Android app. Otherwise, all links will open in device browser.
myView.setWebViewClient(new WebViewClient());Final Code in onCreate function
@Override
    protected void onCreate(Bundle savedInstanceState) {
        super.onCreate(savedInstanceState);
        setContentView(R.layout.activity_main);

        // Binding WebView variable with our webView element in activity_main.xml using id
        myView = (WebView)findViewById(R.id.myViewElement);

        // Get Web Settings to make Javascript enable for your website.
        WebSettings webSettings = myView.getSettings();
        webSettings.setJavaScriptEnabled(true); // It will make Javascript Enable for your website.
        myView.loadUrl("https://digital.devildoxx.com"); // Loading Your website in your webview element

        // Open Link on your website inside app without opening device browser.
        myView.setWebViewClient(new WebViewClient());
    }
Back Button Functionality
Just copy and then paste below function after onCreate.
@Override
    public void onBackPressed() {
        if (myView.canGoBack()) {
            myView.goBack();
        } else {
            super.onBackPressed();
        }
    }
There is if condition in it. It means when user hit back button, it will force WebView to load previous URL inside your Android app. Once there is no previous URL, then it will exit the application.
Final Code in MainActivity.java
package com.digital.devildoxx; // Replace it with your package name.

import androidx.appcompat.app.AppCompatActivity;

import android.os.Bundle;
import android.webkit.WebSettings;
import android.webkit.WebView;
import android.webkit.WebViewClient;

public class MainActivity extends AppCompatActivity {

    private WebView myView;

    @Override
    protected void onCreate(Bundle savedInstanceState) {
        super.onCreate(savedInstanceState);
        setContentView(R.layout.activity_main);

        // Binding WebView variable with our webView element in activity_main.xml using id
        myView = (WebView)findViewById(R.id.myViewElement);

        // Get Web Settings to make Javascript enable for your website.
        WebSettings webSettings = myView.getSettings();
        webSettings.setJavaScriptEnabled(true); // It will make Javascript Enable for your website.
        myView.loadUrl("https://digital.devildoxx.com"); // Loading Your website in your webview element

        // Open Link on your website inside app without opening device browser.
        myView.setWebViewClient(new WebViewClient());
    }

    // Back Button Functionality

    @Override
    public void onBackPressed() {
        if (myView.canGoBack()) {
            myView.goBack();
        } else {
            super.onBackPressed();
        }
    }
}
Building Your APK file to install in your mobile

Go to Build> Build Bundle then click Build APK. Once build is generated then you will pop up message in bottom right

Click on Locate and then you will see your Android App apk in File Explorer

Connect your device with your computer. Copy and then Paste Android App file in your Mobile Storage.
Now, open your Android App file and install in your mobile. You will see some warning’s as you are directly installing apk. Ignore it and then click Install Anyway.
Now, you can see your Android app in App Drawer.

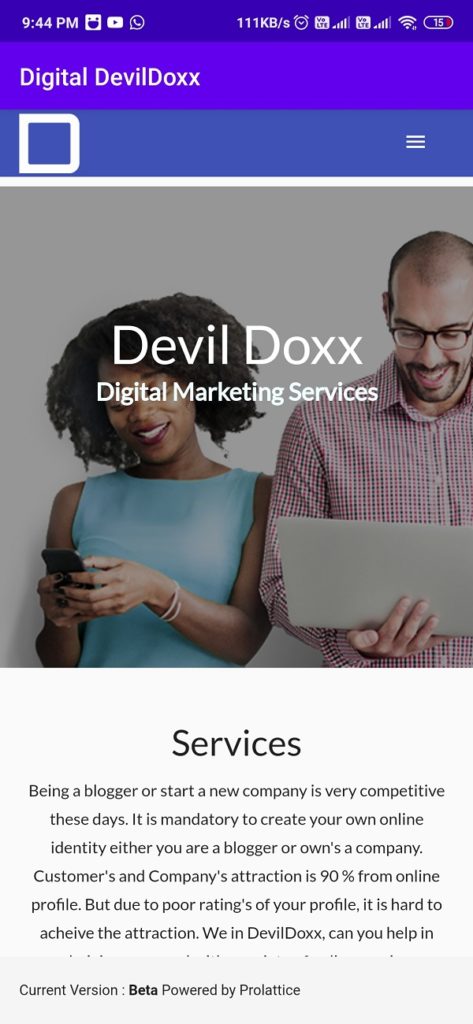
Click on your Android App and then you will see your app running
For any type of query mail at devildoxx@gmail.com
For Social Media Promotions, please visit https://digital.devildoxx.com

