In this tutorial you will learn how to develop a simple wordpress plugin.For creating a wordpress plugin you must fulfill following requirements.
Requirements to develop wordpress plugin
- A Server Supporting PHP and MySQL
- PHP Code Editor
- And basic knowledge of PHP
If you have above 3 requirements then it is very easy for you to develop a plugin. Creating a wordpress plugin needs only 3 steps that are
- Installing Wordpress CMS
- Develop a plugin
- Install Plugin and Run.
Step 1 How to Install Wordpress
First step you have to do is installing wordpress. If you have already installed your wordpress then scroll down to Step 2. For Installing wordpress you must download latest version of wordpress from here. You will get a zip file. After that follow the below steps for installing wordpress :-
- Upload Zip file to your server and Copy zip file in folder in which you want. If you are using localhost then copy zip file to your local website folder.
- Extract files in your folder or root directory of your website. Suppose your website is http://mydemosite.com or for local it is http://localhost/mydemosite/. Make sure that file index.php lies in your root directory or folder.
- Run your website you will see wordpress installation page like below : –

Click on Continue and then follow the steps to install wordpress. After installing login to dashboard of your website.
Step 2 How to Develop a simple wordpress plugin ?
After completing step 1 , start developing a plugin. First create a simple folder in your Desktop, Laptop or anything. Rename your created folder to your plugin name just say “mytestplugin” . Then follow below instructions to develop a plugin :-
- Open that “mytestplugin” folder.
- Create a php file with exactly same name as your folder name. File name will be mytestplugin.php.
- Open “mytestplugin.php” in your code editor and paste below code.
<?php
/*
 *  @package mytestplugin
*/

/*
Plugin Name: My Test Plugin
Plugin URI: https://www.devildoxx.com
Description: Your Plugin Description will be here....
Author: Devildoxx
Version: 1
Author URI: https://www.devildoxx.com
License: Your Plugin License type for example GPLv2 or later
*/

function testingPlugin($params)
{
     //Here will be your code
         print_r($params);
}

//Add Shortcode for running above function
add_shortcode("test","testingPlugin");

//in above test is shortcode name, testingPlugin is function name
?>
- Save the file.
- Now compress your plugin folder using .zip compression. You can use Win Rar for compressing folder.
- Follow Step 3
Step 3 Install and Run Your Developed Plugin
Just open your wordpress dashboard and go to plugins page. Plugins page link is visible on left sidebar of your dashboard. Then click on add new plugin. See below screenshot for more details.

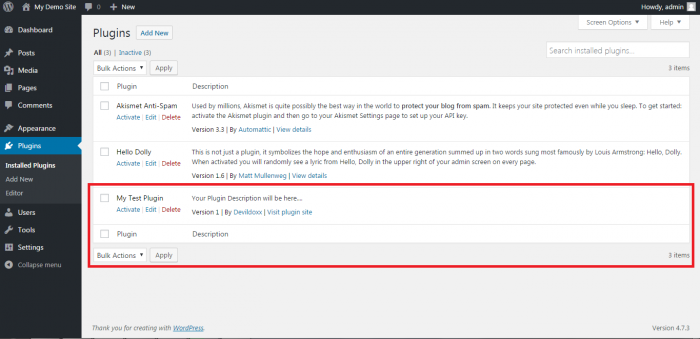
After that you will see option for upload a plugin. Browse your plugin zip file and then click on install. Your Plugin will be activated and visible on Plugins page as shown below : –
Click on Activate Plugin and your plugin will be activated. Now for running just create page in wordpress and paste below code.
[test name="Devildoxx"]
Publish page and then view page in new window. You will see as visible in below screenshot : –

Your Plugin is ready now.
Detailed Summary of Code in Plugin file
For understanding the code in plugin file that is mytestplugin.php in my plugin. I have divided it into 3 parts
- Plugin Details
- Plugin Code
- Run Plugin
Plugin Details
In above created file you can see below code :-
<?php
/*
 *  @package mytestplugin
*/
/*
Plugin Name: My Test Plugin
Plugin URI: https://www.devildoxx.com
Description: Your Plugin Description will be here....
Author: Devildoxx
Version: 1
Author URI: https://www.devildoxx.com
License: Your Plugin License type for example GPLv2 or later
*/
?>
In this code plugin details are mention like Plugin name, Description, Author, Author URI etc. This details are mandatory for developing a plugin in wordpress. Without these details you cannot run and install your plugin. These details are used to show plugin name, version and description on Plugins page. See screenshot below for more understanding.
Plugin Code
//Plugin Code
function testingPlugin($params)
{
    //$params can be renamed to anyname and it will be an array always.
    echo $params['name'];

}


//Adding Shortcode for above function
add_shortcode("test","testingPlugin");
After writing plugin details, you can code your plugin. For testing purpose, I have created a function with name testingPlugin mention in above code. In this function I have pass a variable ‘$params’ for passing parameters in that function. Variable ‘$params’ can be re-named as anyname according to your need. Then inside function I have printed name parameter.
After creating function, add shortcode with any name and pass that function name. Like above .
Run Plugin
You can run plugin by calling your function using shortcode as below :-
[test name="Devildoxx"]
where test is shortcode name and name is the parameter that is going to be printed in testingPlugin function.
